-need to look into clustering algorithms to vet sentiment online, comments presumably.
zapier to agent integration- might be a low code way of getting cron to work without having to spend tokens on api calls via claude: https://docs.zapier.com/sdk/quickstart
Happy 2026! Search Engine Optimization for architects is important particularly because organic search results are often captured by larger organizations even at the local level.
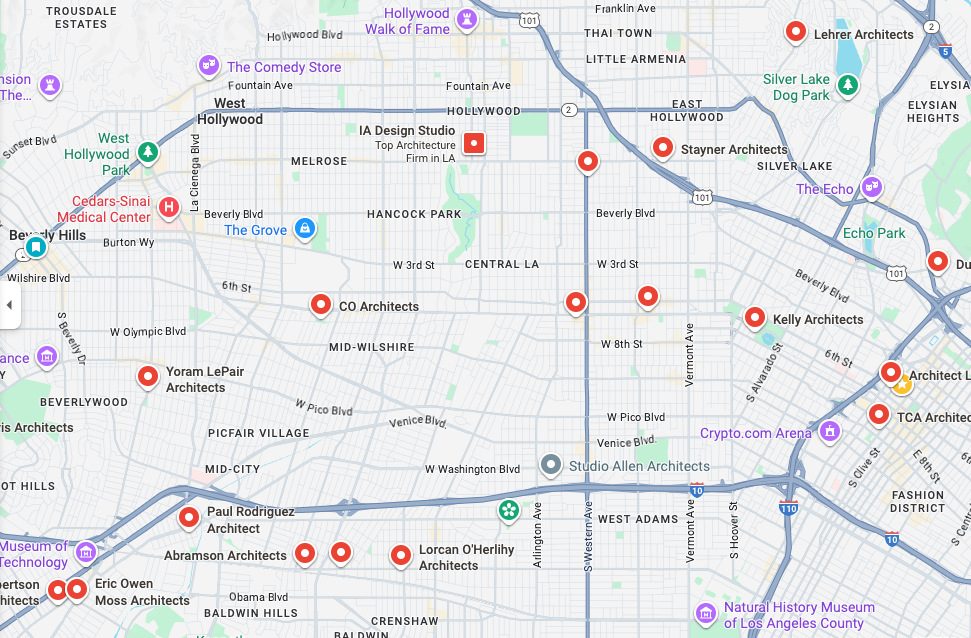
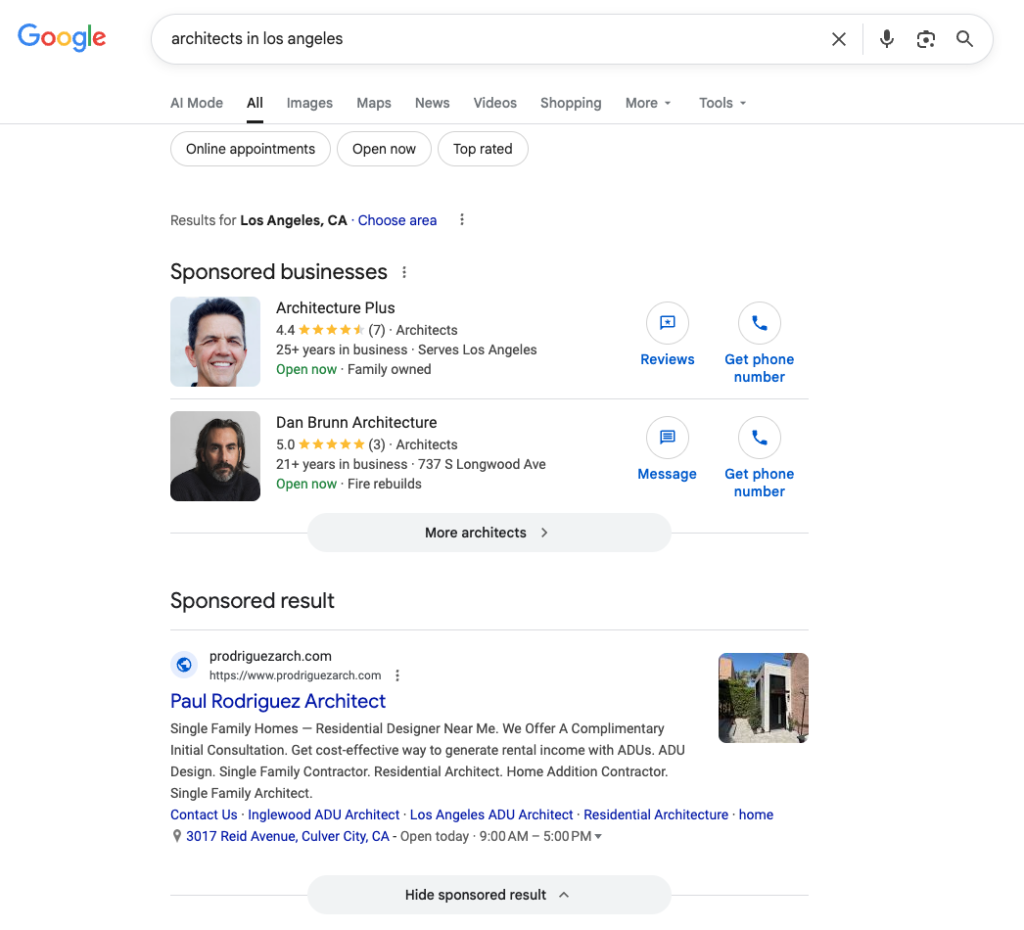
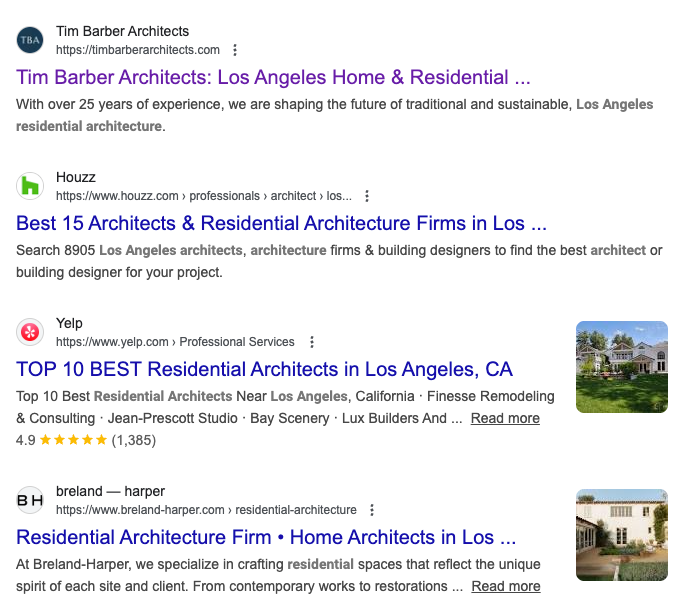
Results in general are buried. When I look up architects in Los Angeles, I get sponsored businesses at the very top of my results, then it’s sponsored results.
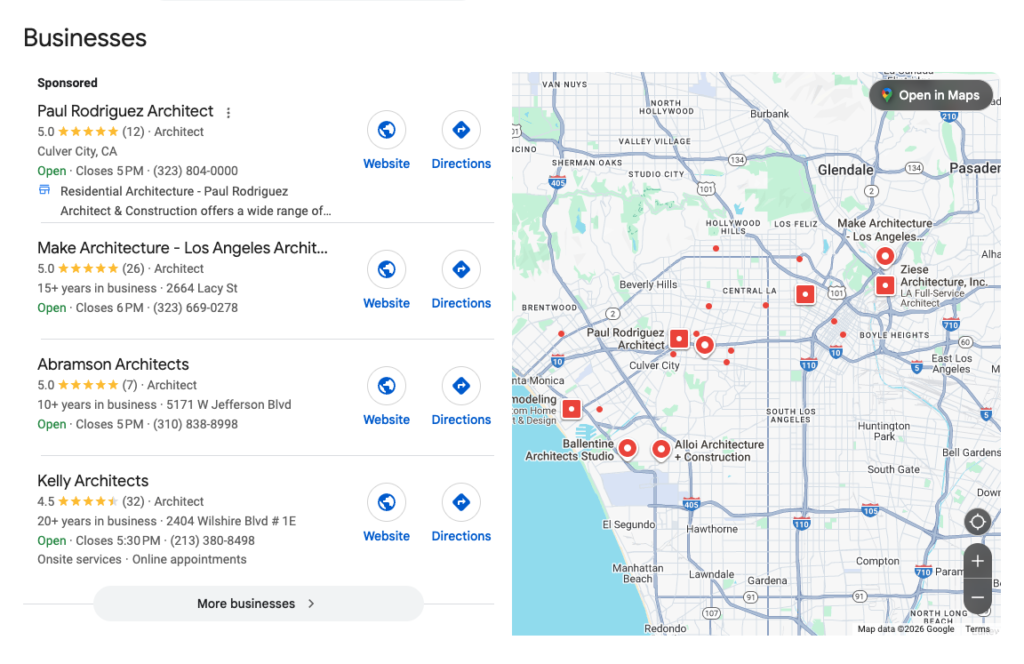
After that I get my first taste of organic results with Google Business Listing.
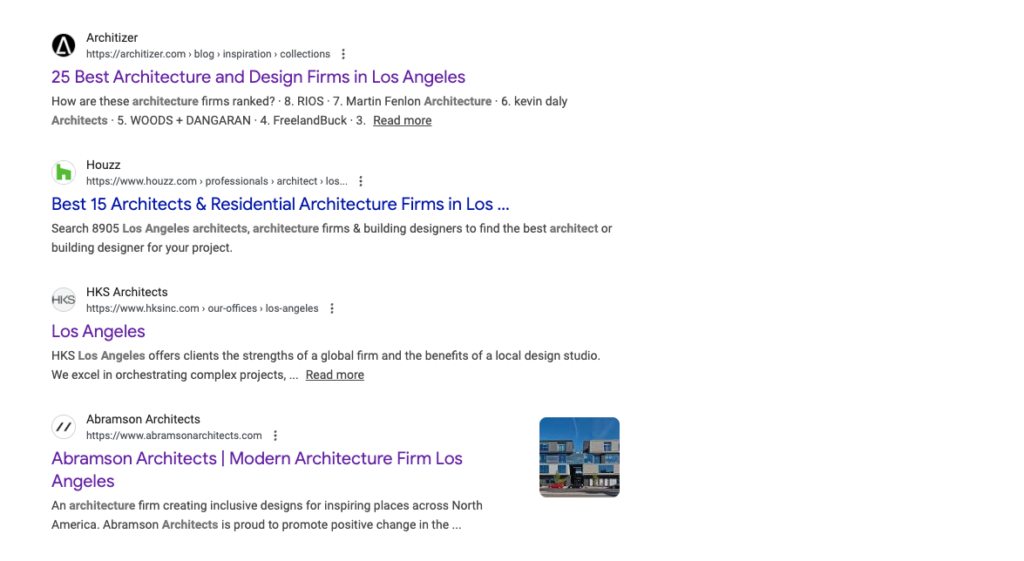
And after that I get the real listing results. Top Three results for me, writing in Harbor City, CA right now is Houzz, Architizer and HKS Architects. It’s taken me a couple of weeks to put together this piece and during my initial research the third result was Abramson Architects followed by Lehrer and then the AIA of Los Angeles.
But, and it’s a big one, if I look up “residential architects in Los Angeles,” we get something incredible. Sure there are still sponsored ads and business listings, but at the top of the search results you get tim barber architects. And this space is competitive, it’s constantly shifting, but Tim Barber Architects is always at the top.
In the spots for second or third in Los Angeles outside of Houzz/Yelp or some other major player (well-financed media/ tech or real estate entity) are SPF: Architects and Breland.
We’re going to talk about why Tim Barber Architect ranks #1 in search consistently.
TLDR: A mix of good press, “curating” websites (mainly used for SEO), and spammy no-follow links. Go to Tim Barber data now
And we’re also going to explore how all of these sites are in top spots and what to do about carving your own space in search in 2026. Even though in 2026, organic search results are buried under a lengthy scroll of ads and rich snippets (rich snippets are google business listings, product recommendations, ai summaries and things like that), organic search is still the engine that drives web traffic. AI chat companies are using google search results as part of its summary strategy, good search placement will drive down the cost of your ads on google and
The space in architecture is dominated by fairly monied entities like Houzz, Architizer and Yelp, but by comparing Tim Barber’s SEO profile to Houzz, Architizer, and other top-ranking competitors, we reveal effective strategies and reverse-engineer what actually works.
SEO for the Big Guys in Architecture
The big guys in architecture when it comes to search are obviously the most talented architects. Just kidding, it’s aggregators.
So, why does Houzz rank so well on Google?
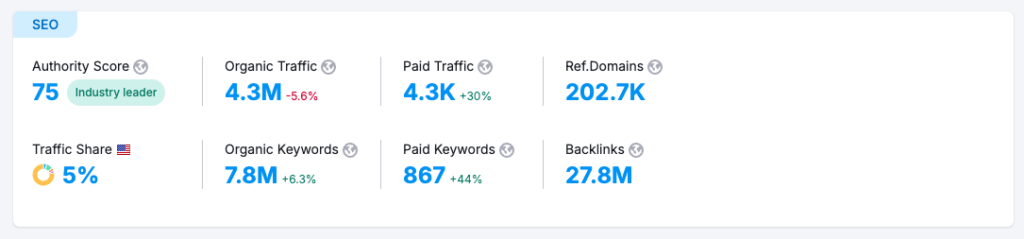
I’m using SEM rush to analyze website data. Houzz has an authority score of 75, they have 27.3 M backlinks and they get around 4.3M visits per month.
Top Keywords are very user oriented: home decor ideas, laundry room ideas in essence competing with Pinterest. We consider this the top of the funnel in digital marketing terms.
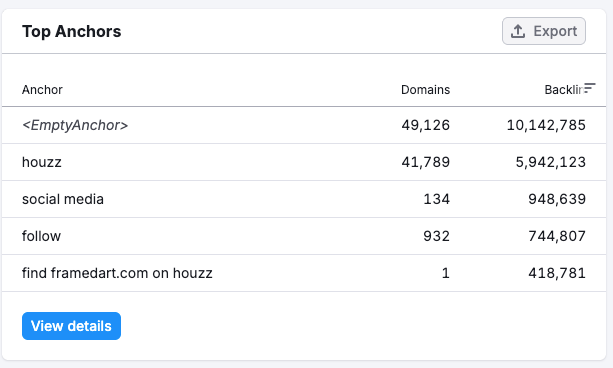
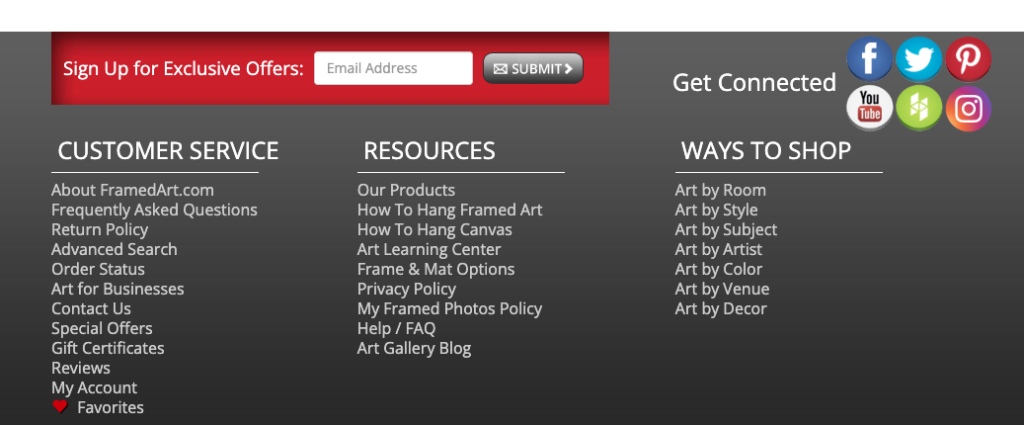
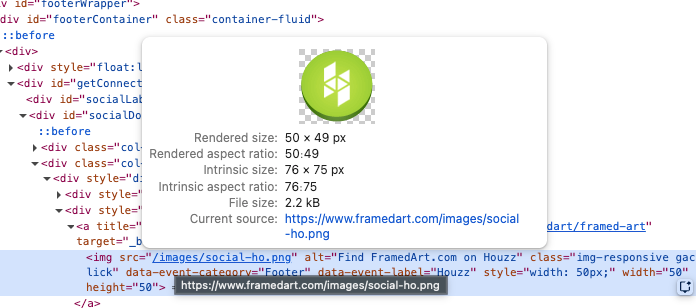
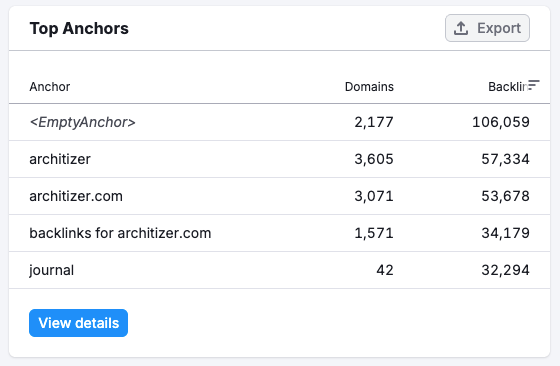
The top anchor information is instructive. For “find framedart.com on Houzz”, that means one website has almost half a million backlinks to HOUZZ. Here’s what that site looks like.
That’s an example of one massive site where the Houzz button is a link that is on every page. If you look at the backend, you’ll find the alt tag reads “find framedart.com on Houzz.” Mystery solved.
The top anchor <empty anchor> is also an image, but with no alt tag. Mini-takeaway here: alt tags and links are important. 50K domains have linked to it with an empty anchor, but it’s produced 10M backlinks. HOW?
This is typical when a site adds your logo and link to a footer or header menu. It’s a classic “badge” strategy and it works really well for Houzz. With 27 million backlinks, and 200,000 domains pointing to it, they are able to create any page, do some on page optimization and rank first pretty quickly.
This is a good time to explain what a link means to the SEO professional. Links are votes of confidence. As an analogue, in a conversation, it sounds like a person (website or page) saying “spanish revivalist architecture is making a comeback,” and in the quoted text there is a source (an article in dwell or Luxe) as to why they believe that. That source, that underpins their claim shows authority in a given subject and is the backbone of search results.
Why does Architizer rank so well on Google?
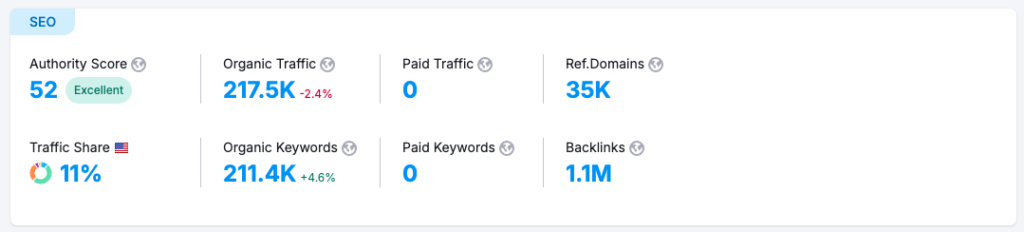
Architizer has an authority Score of 52. With around 215K visits per month and 1M backlinks.
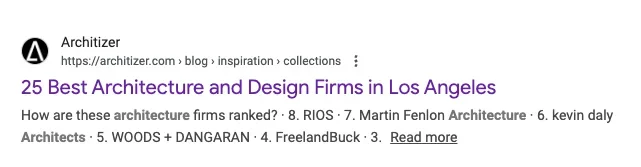
They’re more magazine than aggregator, but bring in a good deal of traffic with informational articles like a listicle on the jeddah tower or the apple headquarters project which brings in 20K visitors per page a month (about 20% of traffic). They’re also creating lists of local architects by region capturing top spots in highly lucrative local searches as shown in the original search result image for “architects in Los Angeles.”
The anchor link situation is similar to Houzz, lots of firms add Architizer or Dezeen to their footer and provide a link.
The real genius behind Architizer strategy is that their process builds momentum. When they announce a design competition, people submit projects and share them across all mediums including their websites.
It also provides Architizer with something to talk about and people to talk to for subsequent articles and marketing campaigns. At the end of the contest, all the winners and runner ups add the press mention to their own site, they do this at least annually, with room for specific contests, across multiple categories.
Additionally, the prestige encourages architects to create architizer profiles and add badges to their sites. Whenever their work is featured, they add another link to the site. It’s a very asymmetric relationship and fairly under-analyzed.
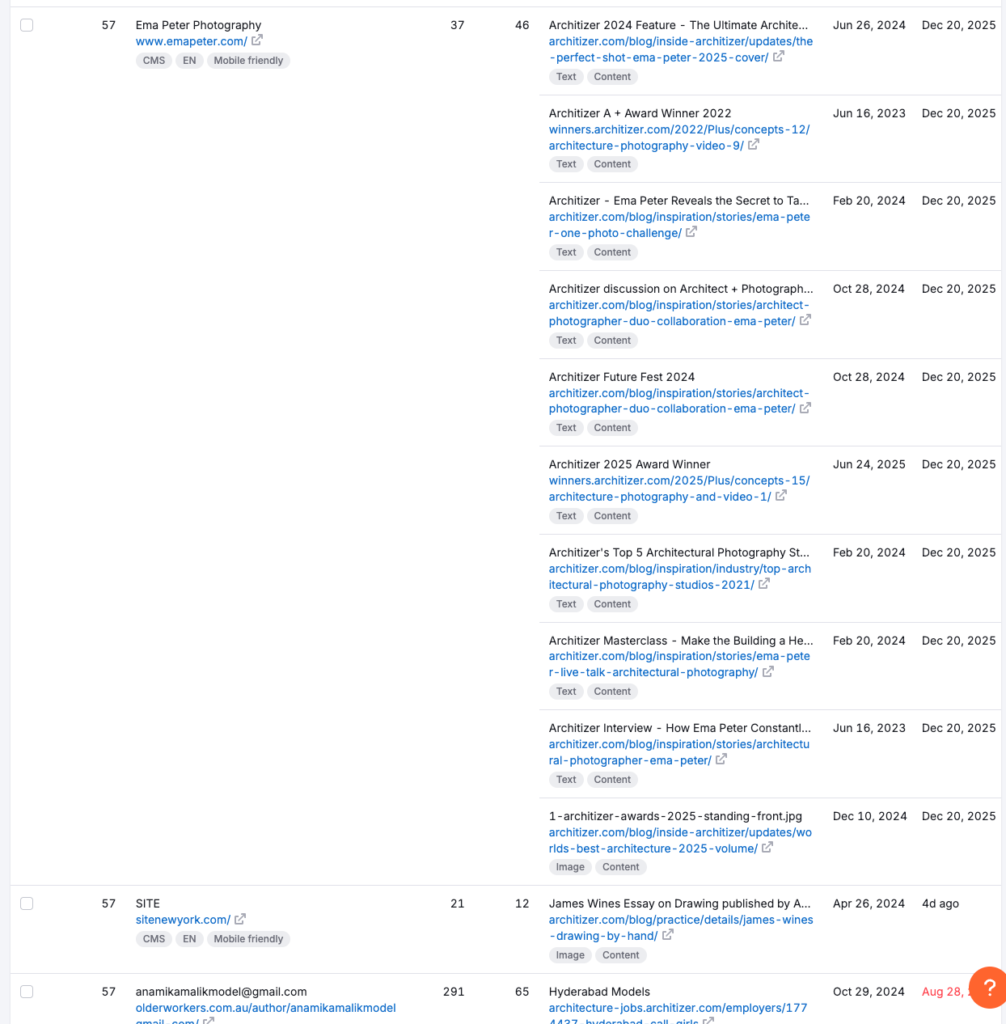
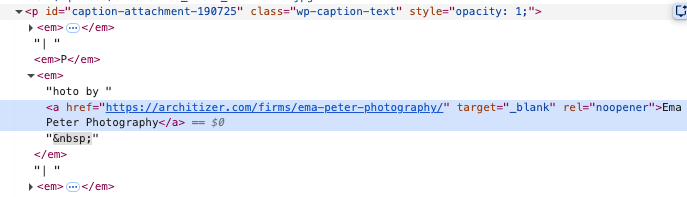
In the case of Ema Peter photography, the photographer has provided 10 backlinks to architizer. Going back to our analogy, this photographer has vouched for Architizer 10 times. The question is does Architizer vouch for Ema Peter? Sort of…
there’s a link to her. Unfortunately it leads to…
It leads to here Architizer profile page. Which to their credit does have a follow link, but the back and forth of link trade off in general is unbalanced. Mostly because people aren’t aware of how to write code, particularly the attributes associated with hyperlinks
DO FOLLOW VS NO FOLLOW
Links point to sources that they trust. In seo jargon we call that link juice. Search engines like google tally up the links, categorize and do some math to arrange search results. When writing a link in HTML markup you have options to add attributes. The attribute we’re going to talk about is the “rel” attribute, which provides specifics about the relationship between the current page and the page linked.
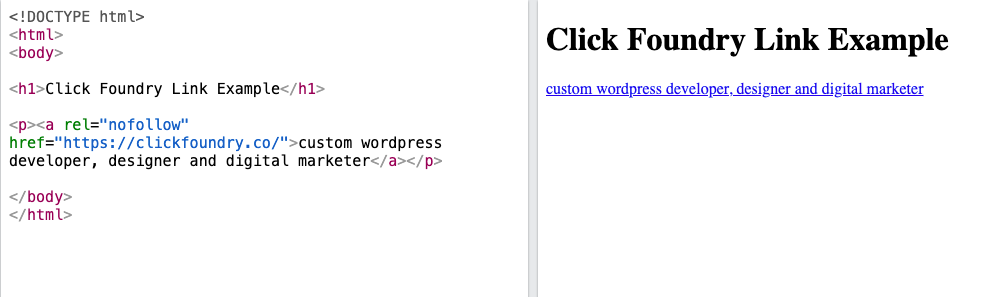
When a link is written like this:
<a rel="nofollow" href="https://clickfoundry.co/">custom wordpress developer, designer and digital marketer</a>
That tells the search engine that the link is not endorsed. This is a matter of link hygiene and it’s a two-way street. There is no reason your firm should be passing link juice to Architizer or HOUZZ indefinitely on every page. You might like the logo and thinks it signals trust, my suggestion is to stick a “nofollow” attribute on it. This allows you to be more intentional with how you use your backlinks.
Looking back at the bigs
The big guys use the lure of prestige or leads and position themselves as industry leaders. They take that trust you have in them and then offer users/subscribers a badge. It’s an ongoing and expensive strategy (the messaging, culling through all of those submissions) providing the infrastructure to keep Houzz in first place. And with AI pulling from search SEO will have greater and greater relevance in the coming years.
Community based organizations
Why does the AIA rank so well on Google?
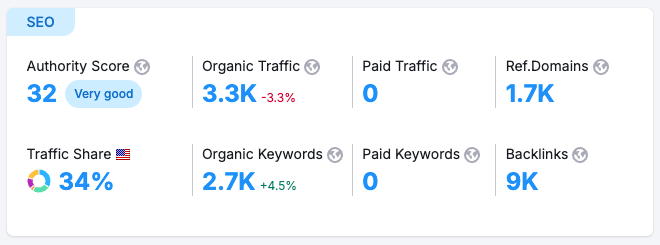
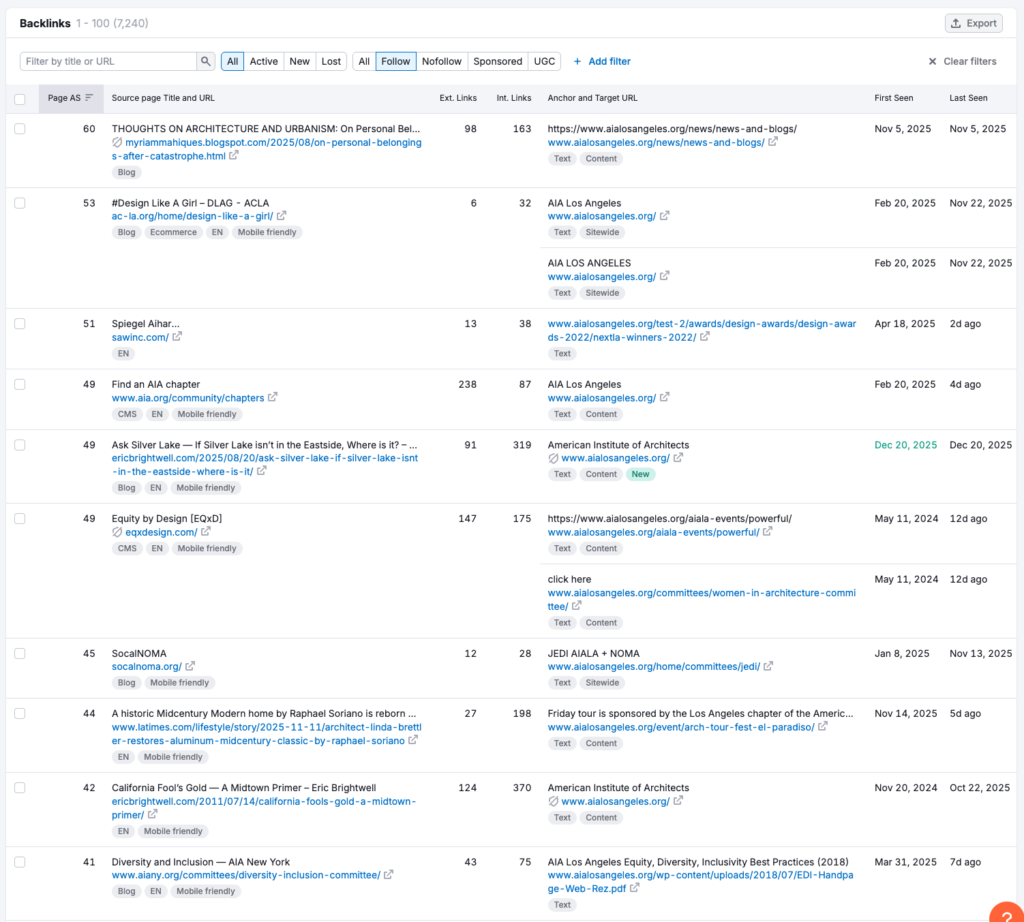
AIA Los Angeles has an authority score of 32, with 9K backlinks out of 1.7K domains. There are blogs that cite the AIA just as an authority about architecture, presumably because of write ups on niche subjects. They also acquired links from other LA based organizations that have partnered with AIA-Los Angeles like the second backlink listed for the “Design Like a Girl” initiative. There were also hundreds of architects that use their industry profile from the AIA-LA website.
The AIA earns media, perhaps from pro-active PR activites or maybe just from them being the local AIA organization. The LA times and the NY times cites the AIA Los Angeles chapter as a source various times. Other notable high value backlinks (domains with authority) include Wikipedia.
Independents
Why does Abramson rank so well on Google?
We’re about to get practical. From 200K websites linking to you (Houzz) to a little under 500, let’s explore what a high performing firm does to get in the top three of search results in a major city.
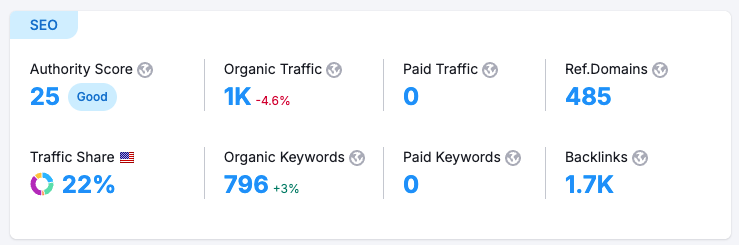
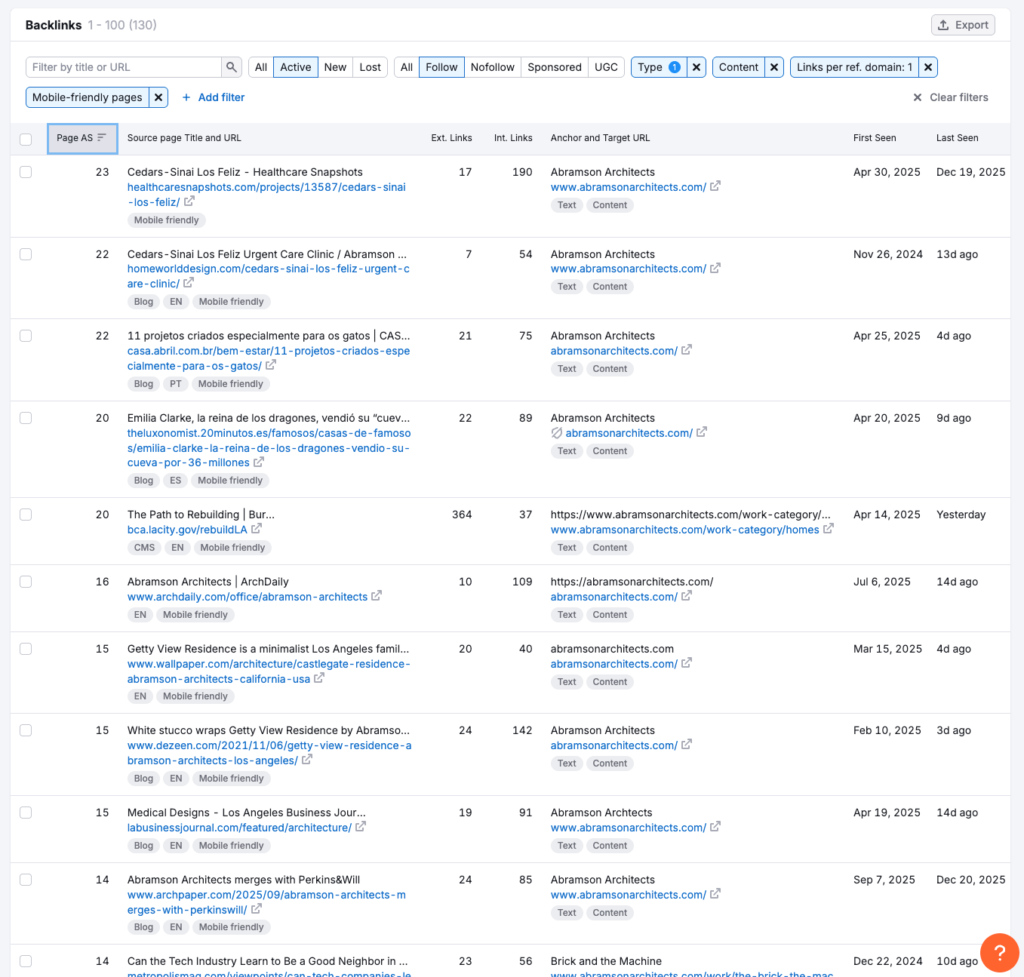
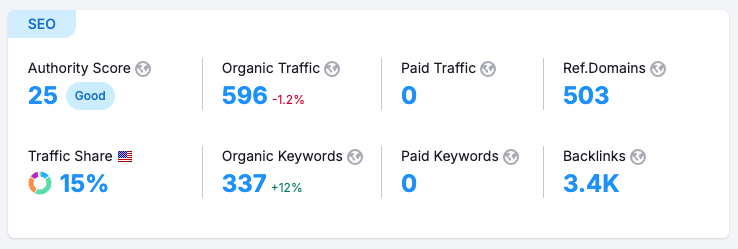
Abramson has an authority score of 25. They get about 1500 monthly visits with about 450 referring domains and and 1600 backlinks with about 400 of them being “no-follow” links most likely on blogs, social media platforms and aggregating sites like Yelp, Houzz and Dezeen. In 2025 they gained almost 400 backlinks.
If you take a look at all of the backlinks provided above. You’ll be able to split them between lower-end curatorial sites, established press outfits, professional organizations and spammier backlinks.
Magazines like Wallpaper* will have an editorial vision or partnership programs and you’ll have to submit your work and cross your fingers on getting traction. Whereas something like “HomeworldDesign” has a fairly easy contact process
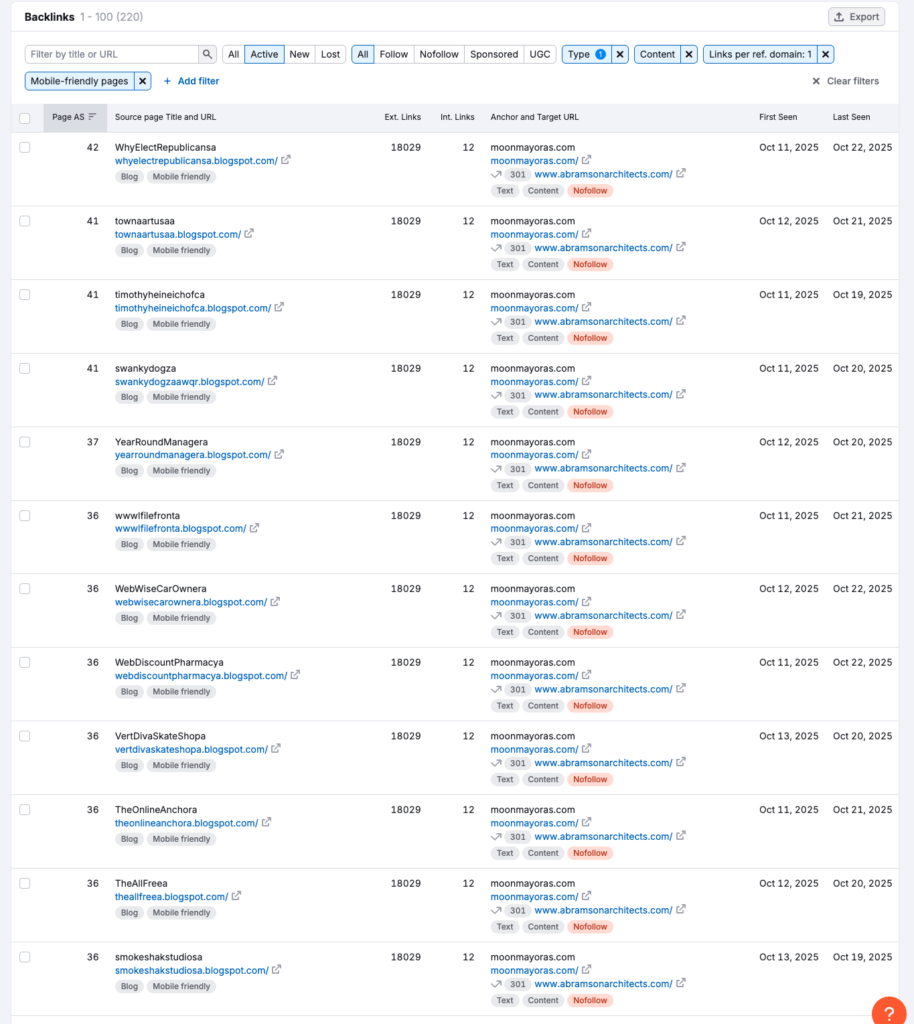
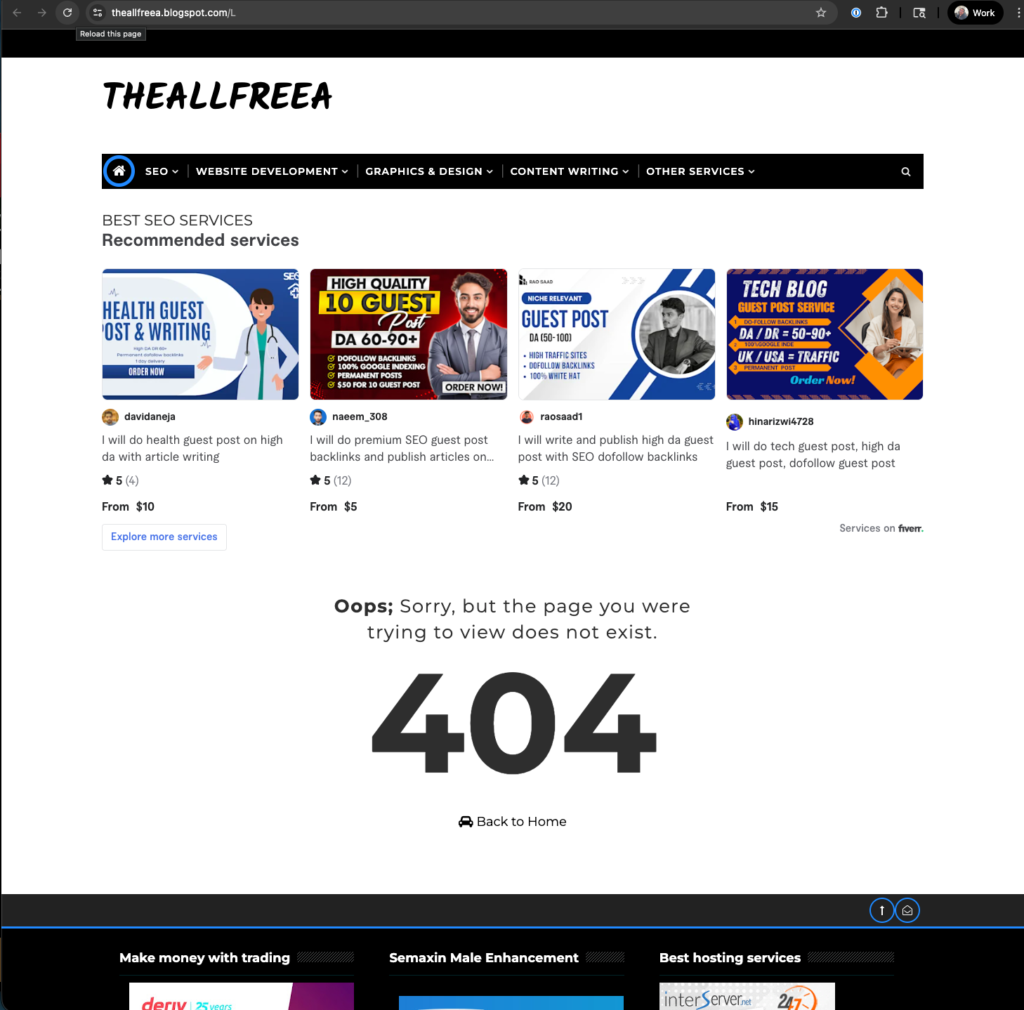
Simultaneously, they have a lot of blogspot subdomains with thousands of backlinks:
Blogspot subdomains carry a good deal of authority. I noticed that the links were hidden and carry a nofollow relationship attribute. The nofollow attribute would negate their importance. That said, there are a few SEO specialists that doubt the word from on high(Google). If you go to one of these blogger style pages, you’ll see this:
A page selling SEO services off fiverr. These are quite risky, because when google finds these networks of links, the domain authority will go from high 30s to 0 overnight, crashing your rankings. This happens with SEO consultants and clients might not know.
How does Tim Barber Architects rank FIRST Google?
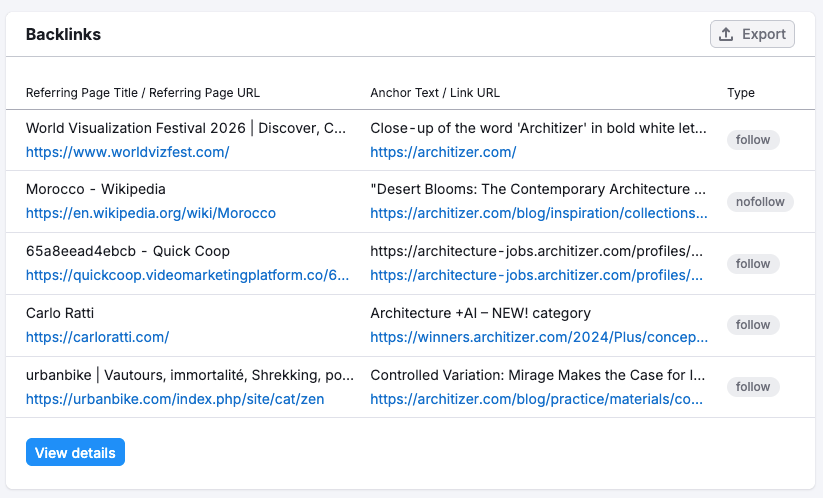
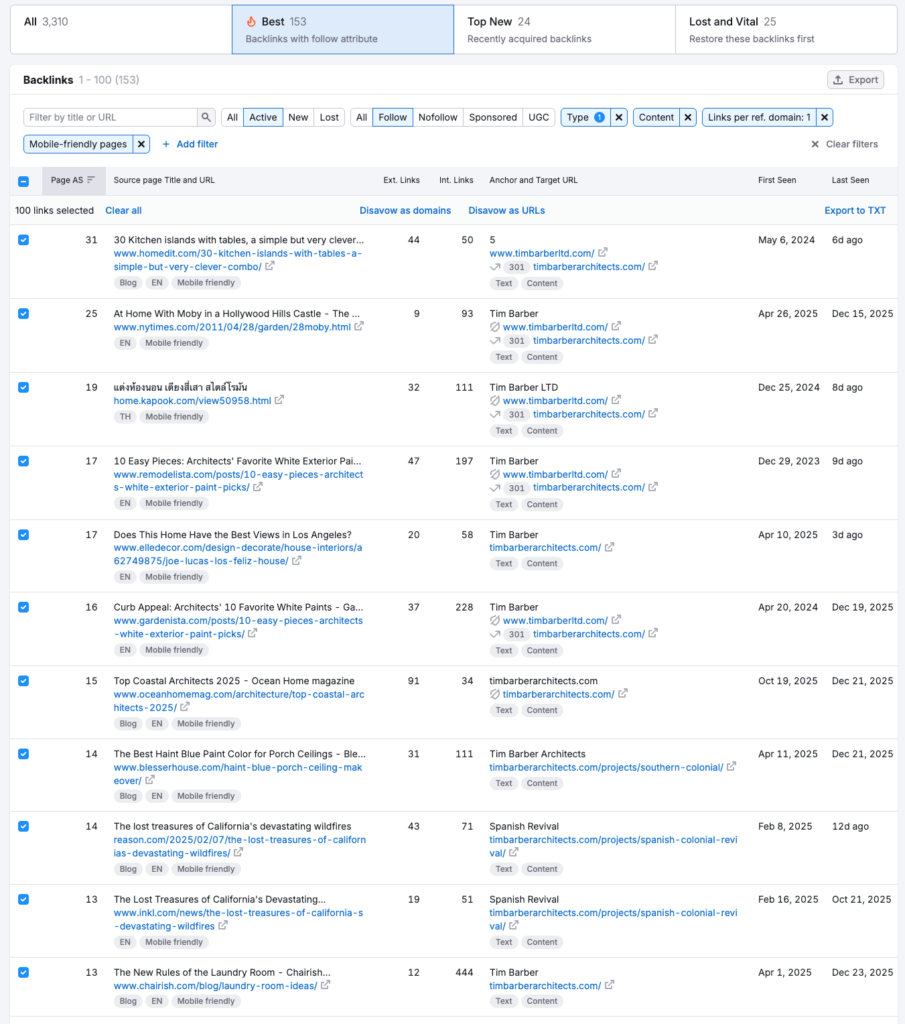
Tim Barber ranks first for “residential architects in Los Angeles” and outside of pretty good on-page seo for an architect, he also has a solid backlink profile. He has an authority score of 25 in SEMRUSH, the same as abramson, but he has 3.4K backlinks with 500 referring domains, about 850 are no-follow links.
Below are some of his best backlinks. There is plenty of opportunity here for a backlink, Homedit for instance has a submission email available as well as submission guidelines. Theres an article from the NY times about high profile homes.
Someone is helming their SEO strategy and doing quite a good job. Their website has 99 blog entries and highly searchable titles on his projects like: Spanish Colonial Revival. Additionally, there are some good PR relationships at work here. Tim Barber is a source for interior design listicles, pieces on the LA vista of a particular project of his and even trends about Laundry rooms. That’s what it takes to win LA.
So far, we’ve identified Barber’s strategy as easy project submissions, good press and solid on page SEO. Similar to Abramson, they also have spammy no follow links:
And when you go there, you can’t find the link anywhere because it’s hidden in the html markup ( a common and old school spammy SEO trick).
Despite the Goliath of aggregators, Barber has been able to rank #1 through savvy PR, submissions and solid on page SEO strategy.
So what’s the takeaway?
You have three paths:
1. PR: Develop relationships with publications and journalists, send out press releases and media kits.
2. Submit Your Work: Document your best projects, submit to publications with open calls (Homedit, ArchDaily, regional design magazines), enter competitions that generate press. Free, but time-consuming.
3. Leverage your network: This is the overlooked play. As an architect, you already work with craftspeople and specialists who have websites and audiences:
Your cabinet maker probably has a blog showcasing custom work
Your marble supplier features projects on their site
Your interior designer writes about collaborations
Your structural engineer has case studies
These are natural, contextually relevant backlinks. Reach out and propose: “Hey, our project together turned out great – want to feature it on your site?” They get content, you get a do-follow link from a relevant domain. Zero cost, completely legitimate, and Google loves this kind of organic relationship.
With Houzz and other aggregator networks vying for top spot, SEO strategy is a continuous endeavor. Barber and Abramson built great work, documented it and hustle for coverage, or they paid someone to do it or them. There’s no magic shortcut – just good work and consistent outreach, whether you do it yourself or hire it out.
When I put together Click Foundry’s new custom WordPress theme after the hack, I knew it would be a process to get the site back up on it feet during off hours or when I could sneak it in. I’ve added a good deal of features and there is more to come. Today, though we’re going to focus on the details. This is the kind of refinement work in web design that rarely gets talked about but makes the difference between a site that feels clunky and one that just works. The desktop menu felt jerky and the mobile behavior was off. At a glance it wasn’t noticeable, but the difference could be felt. Here’s what changed and why it matters.
The Problem
Our original menu implementation had some issues that needed addressing. The desktop menu felt jerky when switching between collapsed and expanded states, and both desktop and mobile versions were using the same JavaScript logic—which didn’t make sense for their different use cases.
Desktop Menu Changes
The main issue was the transition between collapsed and expanded sidebar states. The fix came down to adjusting how the main div responded:
What we changed:
Added easing transitions to the main div’s margins and width, creating one fluid action instead of a jerky switch
Modified the JavaScript behavior so clicking outside the menu no longer collapses it on desktop (you have plenty of space for both the menu and main content)
Now you can open the menu and scroll through the main div freely—it stays open while you navigate
Mobile Menu Changes
We kept the click-outside-to-collapse behavior for mobile, but completely reworked the styling approach:
What we changed:
The main div now stays at 100% of the mobile device width instead of adjusting responsively
When the menu activates, the main div gets pushed over and we hide the overflow—making it feel inaccessible
Clicking within the main div collapses the menu again
Visual Improvements (Both Platforms)
Brightened the menu color for better distinction
Added a subtle border line and box shadow to create visual separation
The Result
These detail pieces—the smooth transitions, the smarter behavior logic, and the refined styling—all come together to make the nav feel significantly better on both platforms.
Or: How I learned to Stop Worrying and Love the OpenAI API
TLDR: I built a WordPress plugin that acts as an immediate point of contact via chatbot using OpenAI’s API, Raleway and Discord. It sets up qualifying questions and pings me on discord when someone uses the chatbot feature.
The Problem: Drop off in lead responses drop drastically after the first hour.
I work with B2B and Technical Service companies: architects, engineers, and manufacturers. The type of client looking at professional services or manufacturing quantities isn’t looking for the buy now button. There are technical questions to be answered and trust to be earned. So, usually the marketing mix includes SEO and search ads funneling into some sort of form.
FORMS WORK. They’re the backbone of so many marketing initiatives. Having someone fill out a form as far as I’m concerned is a win. The problem is that it’s got a half-life. If someone reaches out to you about your service, there’s a good chance they’re shopping around and if you don’t get back to them quickly that lead becomes less and less likely to convert.
I rebuilt the b2b lead nurturing system for an insulated packaging manufacturer in Los Angeles. Their leads were going cold due to slow response times—sometimes hours or days before first contact. Using automated lead response with templated emails and auto-generated drafts, we reduced lead-to-quote time from hours to under 10 minutes. I put myself in the first point of contact position for a few months. I could have the lead onto quoting within 2-3 emails with each email taking less than 5 minutes where an salesperson could pick up the rest of the processes.
Chatbots promise that immediacy on a website. But the issue is that Chatbots are ANNOYING. They’ve been around forever and they suck most of the time. The little corner bubble pops up and there is a generic, “howdy, how can I help?” It’s corny and in the past the scripting wasn’t very good.
Now with chatGPT, claude and more getting into the mix. It seems to me every one of these old services are getting a shot in the arm by bolting on AI to their products. They’re charging a premium for it. The pricing is hard to determine because they charge by features, completions and closes, but let’s say it ranges between $40-$150 per month. Feel free to look around: intercom, hubspot, voiceflow, manychat.
Drift charges up to $2,500 per month for an enterprise version of this software. seriously
A lot of it feels like overkill and part of the issue, I’ve always found with this type of SAAS company is that they build an entire ecosystem that forces you to train on their system. So I thought, I need something simple and I could probably making something more geared to me with a Plugin, AI engine and Zapier. The WordPress chatbot plugin market is kind of messy and most of the time it looks like they’re going to sell you on a service. That’s the thing I’m trying to avoid. So, we’re going to build our own plugin. Something cheap, something we control, something that actually works the way we want it to.
The Stack Decision
First thought: Slack
I’ve used Slack. It’s popular. The integration seemed obvious and I wasn’t going for multiple seats, so I didn’t think much of it. I thought I’d be able to hook into the Slack with a webhook. I went through the process reading their documentation and it just didn’t work, thinngs went sideways. I’m convinced they just want you to sign up and live on their ecosystem.
Then: Discord
I’d been part of several Discord servers—some small, some huge—but I’d never actually created one. Discord is an instant messaging social platform, that allows you to communicate in text, video and voice. It’s usually geared for gaming, socializing and community building. Servers are cake to create, but the flow of information was hard for me to understand at first. Luckily both the messaging app and their developers page was easy to navigate.
AI qualifies them → asks about industry, project, budget, timeline
When they’re serious → Discord thread created, you get pinged
You reply in Discord → message appears on website in real-time
Conversation ends → you have the full transcript in Discord
The AI isn’t following a script. It’s actually understanding what people are saying and adapting. If someone asks “Do you work with municipalities?” it doesn’t break—it responds naturally based on your company info.
The Architecture
This is where it gets interesting. The system has four main components:
Right now, it’s 4 basic files, php to handle all the wordpress backend stuff. JS & CSS for the chatbot popup and a text file called knowledge base where you can manually add in all your information. In time, I’ll split the file up and go through the plugin directory validation process, but for now, you can go to my github and download it there.
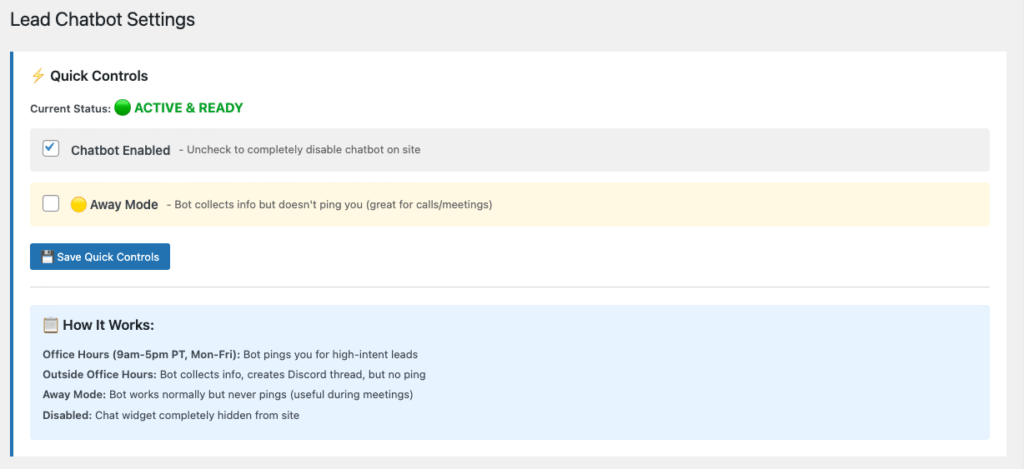
I added some things for myself, like office hours and a radio button that enables and away mode version. The idea being that if you can see me working on my site, you know I’m available for questions and the chatbot should act in a different way in either instance.
Setting up the plugin
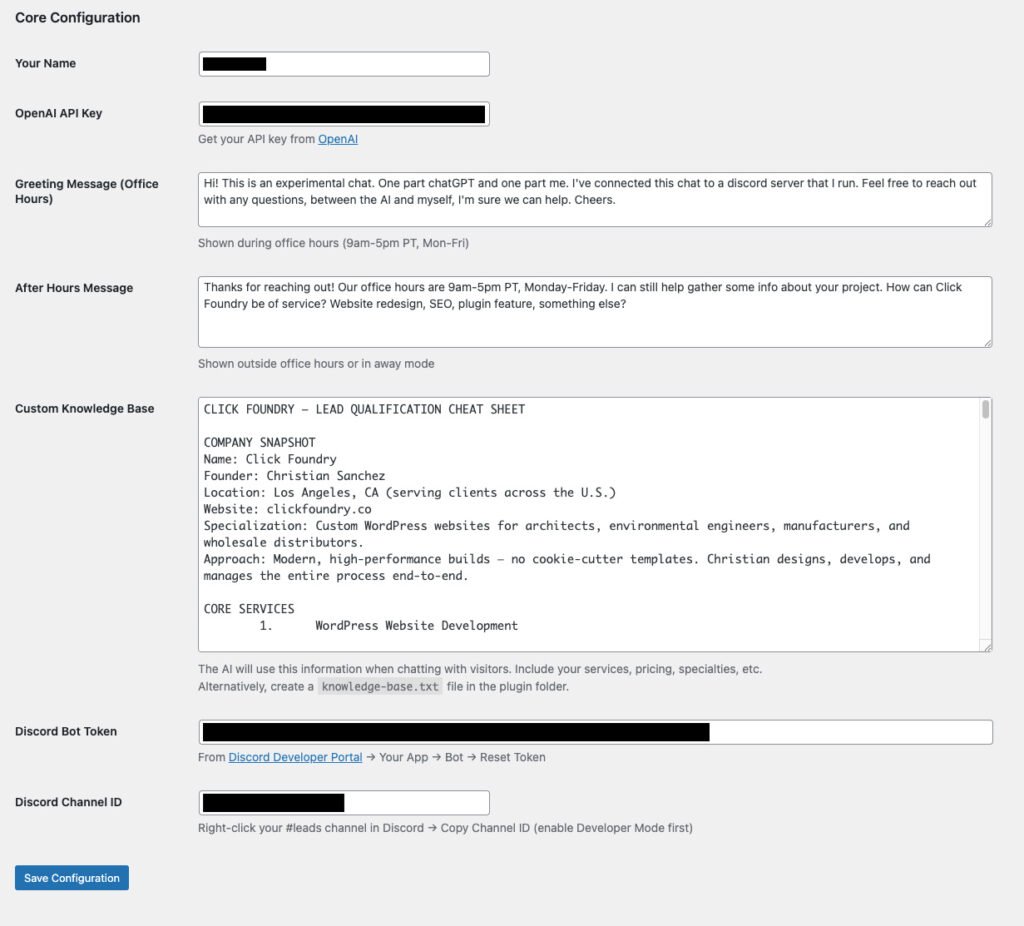
For security purposes. I’ve left all API keys, Tokens and IDs blank in the plugin. You just have to drop them into the plugin settings. In the plugin there is a custom knowledge base text file, but you can also add instructions directly in the plugin.
Why Railway?
I’m taking it for granted you know what a WordPress plugin is and that you’re aware of ChatGPT (OpenAI) and we’ve spent some time discussing Discord. So Railway is a cloud service that allows you to run code from github and can store variables (think databases and API keys) securely.
We need Railway because Discord can’t send the messages typed in the Discord chat back to the WordPress site on its own. Railway is always running, watching discord and it then forwards the messages to WordPress.
So the flow looks like this:
WordPress (sending messages) ─────→ Discord API ─────→ Your #leads channel
                                         ↑
                                         │
                                    Bot Token
                                         │
                                         ↓
Railway Bot (listening) ←───────── Discord API ←────── Your replies in Discord
         │
         └─────→ WordPress REST API ─────→ Visitor sees your reply
How to set up Discord for your Lead System with Railway.app
Step 1: Create Your Discord Server
Your Discord server is your private workspace where all lead notifications will appear. If you already use Discord, you probably have a personal server or are part of other servers—this will be your dedicated space just for business leads.
Creating a server is free and takes about 30 seconds. Open Discord (desktop app or web) and look for the green plus icon on the left sidebar. Click it and choose “Create My Own” → “For me and my friends” (or skip the template). Name it something like “Lead Management” or “Business Workspace.”
Once created, your server will have a URL that looks like https://discord.com/channels/1234567890/. That long number is your server ID—you won’t need it directly, but it’s how Discord identifies your server.
Step 2: Create Your #leads Channel and Get the Channel ID
Inside your new server, you’ll see a default “#general” channel. You want to create a dedicated channel specifically for lead notifications. Click the plus icon next to “Text Channels” in your server sidebar and name it “leads” (or “new-leads”, “inquiries”, whatever makes sense).
Now here’s the important part: you need to copy the Channel ID. Discord doesn’t show IDs by default, so first you need to enable Developer Mode. Go to User Settings (gear icon in bottom left) → Advanced → toggle on “Developer Mode.” This lets you right-click any channel, server, or user and see their ID.
Right-click your newly created #leads channel and select “Copy Channel ID.” You’ll get something like 987654321098765432. Save this somewhere—you’ll paste it into your WordPress plugin settings later.
Step 3: Create Your Bot in the Discord Developer Portal
This is where things get a bit confusing. In Discord’s world, what you think of as a “bot” is actually called an “Application” that has a “Bot User” attached to it. The Application is the container, the Bot User is what actually connects to Discord.
Head over to the Discord Developer Portal at https://discord.com/developers/applications and click the blue “New Application” button in the top right. Give it a name like “Lead Chatbot” or “Website Assistant”—this name is just for your reference and won’t be visible to site visitors.
Once created, you’ll see a dashboard with several tabs on the left. Click on “Bot” and then click “Add Bot.” This creates the actual bot user that will interact with Discord. You’ll see a token appear—this is your Bot Token, and it’s essentially the password your code uses to authenticate. Click “Reset Token” to generate a fresh one, then “Copy” to save it somewhere secure. Never share this publicly or commit it to GitHub—treat it like a password.
While you’re on the Bot page, scroll down to “Privileged Gateway Intents.” These are special permissions that bots need to request explicitly. Check the boxes for “MESSAGE CONTENT INTENT” (so the bot can read what people type) and “SERVER MEMBERS INTENT” (so the bot can see who’s in the server). Without these enabled, your bot won’t be able to read messages or create threads properly.
Step 3a: Generate an Invite URL and Add Your Bot to Your Server
Now you need to actually invite the bot to your server. Go to the “OAuth2” tab in the Developer Portal, then click “URL Generator” in the submenu.
Under “Scopes,” check the box for bot. This tells Discord you’re generating a URL to invite a bot. A second section will appear below labeled “Bot Permissions.” Check these boxes:
Send Messages
Create Public Threads
Send Messages in Threads
Read Message History
These permissions let your bot create thread conversations and send notifications. Discord will generate a URL at the bottom of the page that looks like https://discord.com/api/oauth2/authorize?client_id=...&permissions=...&scope=bot.
Copy that URL, paste it into your browser, and Discord will ask which server you want to add the bot to. Select your newly created server from the dropdown and click “Authorize.” Your bot will now appear in your server’s member list (though it’ll be offline until you actually run the code).
Back in your WordPress admin, go to Settings → Lead Chatbot. You’ll see fields for “Discord Bot Token” and “Discord Channel ID.” Paste in:
The Bot Token you copied from the Developer Portal
The Channel ID you copied from your #leads channel
Save the settings. Your WordPress plugin can now send messages to Discord.
Step 5: Deploy the Railway Bot Listener
WordPress can send messages to Discord, but it can’t receive them—Discord doesn’t have a way to push messages to WordPress automatically. So we need a small Node.js bot running 24/7 that watches Discord for your replies and forwards them back to WordPress.
Railway.app is a free hosting platform (free tier is generous enough for this) that makes deployment simple. Create an account at https://railway.app, then create a new project by clicking “New Project” → “Empty Service.”
You’ll need two files: bot.js (the code that listens to Discord) and package.json (which tells Railway what dependencies to install). Upload both files or connect a GitHub repo.
In your Railway project settings, add two environment variables:
BOT_TOKEN: Your Discord bot token (same one from WordPress)
Railway will automatically detect that it’s a Node.js project, install the dependencies from package.json, and run node bot.js. You can find the bot.js file in the corresponding github repo. Within a minute or two, your bot will come online in Discord (you’ll see it change from offline to online in your server’s member list).
Send a message like “Hi, I’m interested in your services”
Check your Discord #leads channel—you should see a new thread created with the conversation
Reply in that Discord thread
Check your website—your reply should appear in the chat within 2-3 seconds
If that works, you’re live!
The Numbers Breakdown
Monthly costs:
OpenAI API: ~$5-15/month (GPT-4o-mini, ~$0.001 per conversation)
Railway: $0 (free tier) or $5/month
Discord: $0
WordPress: Already paying for hosting
Total: $5-20/month
Compare that to:
Intercom: $74-149/month minimum
Drift: $2,500/month (yes, really)
HubSpot Chat: $45-800/month
And you own all of it. Your data, your transcripts, your control.
What’s Next
This is version 1.0. It works, it’s in production, and it’s free if you want the code.
But I’m working on version 2.0 with:
Google Drive integration (OAuth-based, auto-saves transcripts)
CRM connections (auto-create contacts in HubSpot/Pipedrive)
Lead scoring (AI analyzes conversation quality)
Follow-up automation (draft emails based on chat context)
Analytics dashboard (conversion rates, common questions, time-to-response)
This is the beginning of a marketing automation workflow or at the very least proper lead system that accounts for the entire funnel. Getting someone to your site is huge. Giving them a way to interact immediately—without forcing them to fill out a form and wait—that’s the competitive advantage.
Why This Matters
Chat interfaces are becoming familiar. ChatGPT trained everyone. It doesn’t feel novel anymore, it feels familiar.
And here’s the thing: search is exploratory, chatting feels personal. When someone lands on your site wondering “Is this company right for me?”, a chat that can actually answer their questions is infinitely better than forcing them to hunt through your Services page.
You’re giving people their own personal ChatGPT that knows your business.
The SaaS companies charging $500/month are going to have a rough time when their customers realize they can build better for $10.
Want This For Your Business?
If you’re interested in bringing this to your business and pushing the product forward, reach out. I’m actively developing version 2.0 and working with a company to expand the feature set. email is chrisitian@clickfoundry.co or use the chat bot.
The current version is free. If you want the code to tinker with, check out the repo. If you want to integrate something like this into your website or workflow, again let me know via email.
The business need was clear: we needed intelligent video routing that could automatically display different content based on time, availability, and operational status.
The problem:
Live stream shouldn’t play outside office hours
Need manual control for breaks and technical issues
Different videos needed for different scenarios
Non-technical users need to manage this without touching code
What We Built
We transformed a basic video player into a smart video management system with three key capabilities:
1. Time-Aware Routing
The system needed to know when the office was open (9am-5pm Los Angeles time, Monday-Friday). Outside those hours, visitors should see an “After Hours” message video instead of the live stream.
Why this matters:
No one wants to watch an empty office at night
Automatic behavior = zero maintenance
Sets proper expectations for visitors
Saves bandwidth when stream isn’t relevant
2. Manual Override Controls
Operations teams needed a simple toggle to turn the stream on/off without touching code. When disabled, they could choose between preset scenarios:
Lunch Break – “We’ll be back soon”
Technical Difficulties – “Experiencing issues”
Why this matters:
Quick response to technical problems
Professional messaging during breaks
No need to SSH into the server
Content managers can handle it
3. Dual Platform Support
While the main stream lives on Cloudflare, the fallback videos are hosted on Vimeo. The plugin needed to seamlessly switch between both platforms with different embed requirements.
Why this matters:
Don’t put all eggs in one basket
Vimeo’s background mode perfect for looping fallbacks
Cloudflare optimized for live streaming
Each platform does what it’s best at
The Implementation Journey
Step 1: Admin Settings Panel
First, we added a WordPress admin menu page where administrators could configure everything:
public function add_admin_menu() {
    add_menu_page(
        'CF Stream Settings',
        'CF Stream',
        'manage_options',
        'cf-stream-settings',
        [ $this, 'render_admin_page' ],
        'dashicons-video-alt3',
        100
    );
}
This gave us a dedicated settings page accessible from the WordPress admin sidebar with a clean video icon.
Design considerations:
Put it in the main admin menu (not buried in Settings)
Use a recognizable icon (dashicons-video-alt3)
Clear, descriptive page title
Only visible to users with manage_options capability
Step 2: Settings Structure
We designed a settings array that captured all configuration needs:
private function get_default_settings() {
    return [
        'cf_uid' => '',                      // Cloudflare Stream UID
        'cf_customer_code' => '',            // Cloudflare customer code
        'stream_enabled' => true,            // Master on/off switch
        'office_hours_enabled' => true,      // Time-based routing
        'fallback_video' => 'lunch',         // Which fallback to show
        'vimeo_after_hours' => '',           // After hours video ID
        'vimeo_lunch' => '',                 // Lunch break video ID
        'vimeo_technical' => '',             // Technical difficulties video ID
    ];
}
Why this structure works:
All related settings in one array
Clear naming convention
Boolean flags for easy toggling
Separate IDs for each scenario
Sensible defaults
All settings are sanitized on save and stored in a single WordPress option for efficient retrieval:
DateTimeZone('America/Los_Angeles') – Always use explicit timezone (no server timezone assumptions)
format('G') – 24-hour format without leading zeros (9, not 09)
format('N') – ISO-8601 day of week (1=Monday, 7=Sunday)
Simple boolean logic for weekdays 9am-5pm
Why explicit timezone matters: Your server might be in Virginia, but your office is in Los Angeles. Using server time would show the wrong videos for 3 hours every day.
This returns a simple boolean that’s checked every time someone loads the page. No caching, no complexity—just “are we open right now?”
Step 4: Priority-Based Video Routing
The shortcode renderer became a decision engine with clear priority order:
background=1 – Vimeo’s special background video mode (crucial for auto-looping)
autoplay=1 – Start immediately
loop=1 – Continuous playback
muted=1 – No audio (required for autoplay)
controls=0 – Clean presentation
The background=1 parameter is key—it’s Vimeo’s special mode for background videos that automatically handles continuous playback without showing any UI.
Cloudflare vs Vimeo rendering:
private function render_player($video_type, $video_id, $options) {
    if ($video_type === 'vimeo') {
        return $this->render_vimeo_player($video_id);
    }

    // Cloudflare Stream (HLS.js handles this via JavaScript)
    return sprintf(
        '<div class="cf-stream">
            <video id="cfStream_%s"
                   width="800"
                   height="450"
                   autoplay
                   muted
                   playsinline>
            </video>
        </div>',
        esc_attr($video_id)
    );
}
Cloudflare outputs a simple <video> element that gets initialized by our HLS.js player class. Vimeo outputs a fully-functional iframe with all parameters baked in.
Step 6: Styling Architecture
To meet the design requirements, we created two semantic class names:
Admin unchecks "Enable Stream" → Selects "Technical Difficulties" → User sees Vimeo technical video
No page refreshes needed. The decision happens server-side on every page load.
What’s Next?
Future enhancements could include:
Custom office hours – Not just 9-5, configure specific times
Multiple timezone support – Offices in different cities
Scheduled maintenance windows – Plan downtime in advance
Analytics tracking per video type – Which videos are people seeing most?
Preview mode before saving changes – See what users will see
More fallback video options – Weekend video, holiday video, etc.
Stream health monitoring – Automatic fallback if stream goes down
Webhook integration – Trigger stream toggles from external systems
Common Customizations
Change Office Hours
Edit the is_office_hours() method:
private function is_office_hours() {
    $la_time = new DateTime('now', new DateTimeZone('America/Los_Angeles'));
    $hour = (int) $la_time->format('G');
    $day_of_week = (int) $la_time->format('N');

    // Change to 8am-6pm
    return ($day_of_week >= 1 && $day_of_week <= 5)
        && ($hour >= 8 && $hour < 18);
}
Add a Third Fallback Option
Extend the settings array and admin form:
// Add to default settings
'fallback_video' => 'lunch', // Change to support 'lunch', 'technical', 'weekend'
'vimeo_weekend' => '',

// Update the routing logic
if ($options['fallback_video'] === 'lunch') {
    $video_id = $options['vimeo_lunch'];
} elseif ($options['fallback_video'] === 'weekend') {
    $video_id = $options['vimeo_weekend'];
} else {
    $video_id = $options['vimeo_technical'];
}
Support Multiple Timezones
Make timezone configurable:
// Add to settings
'office_timezone' => 'America/Los_Angeles',

// Update the check
private function is_office_hours() {
    $options = get_option('cf_stream_settings', $this->get_default_settings());
    $office_time = new DateTime('now', new DateTimeZone($options['office_timezone']));
    // ... rest of logic
}
Conclusion
What started as a basic iframe embed evolved into an intelligent content delivery system. By adding custom functionality to WordPress the plugin added administrative controls, time-based logic, and multi-platform support, we created a tool that adapts to business needs automatically while remaining simple for content managers to control.
The best plugins solve real problems with minimal complexity.
This one does exactly that—smart video routing with a few checkboxes and text fields.
The architecture is extensible, the code is maintainable, and the user experience is seamless. That’s the goal.
A technical deep-dive into making live video streams work with single-page application transitions
The Problem
Ever tried combining smooth page transitions with live video streaming? If you have, you’ve probably run into the same headache I did: video players breaking after Barba.js transitions.
The issue is straightforward but frustrating. Barba.js creates smooth page transitions by replacing DOM content, but when it does that, your carefully initialized video players get destroyed. The video element is still there in the HTML, but the player instance? Gone.
Here’s what we were working with—a simple Cloudflare Stream video element:
After a Barba transition, the video element would be re-rendered in the DOM, but the HLS.js player instance that was managing playback? Completely destroyed. No video, no recovery, just a dead player.
The Existing Solution (Almost There)
The initial code was actually pretty solid—a self-contained plugin that handled HLS streaming with error recovery and a watchdog timer to detect stalled streams:
(function () {
  function initPlayer(videoId, src) {
    const VIDEO = document.getElementById(videoId);
    if (!VIDEO) return;

    let hls;

    // HLS initialization logic
    if (VIDEO.canPlayType('application/vnd.apple.mpegurl')) {
      // Native HLS support (Safari)
      VIDEO.src = src;
      VIDEO.addEventListener('loadedmetadata', () => {
        VIDEO.play().catch(() => {});
      }, { once: true });
    } else if (window.Hls && Hls.isSupported()) {
      // HLS.js for other browsers
      hls = new Hls({ lowLatencyMode: true });
      hls.attachMedia(VIDEO);
      hls.on(Hls.Events.MEDIA_ATTACHED, () => {
        hls.loadSource(src);
        hls.startLoad();
      });

      // Error handling
      hls.on(Hls.Events.ERROR, (_, data) => {
        if (!data.fatal) return;
        // Recovery logic...
      });
    }

    // Watchdog timer to detect stalls...
  }

  document.addEventListener('DOMContentLoaded', () => {
    if (!window.CFStreamSources) return;

    for (const id in window.CFStreamSources) {
      initPlayer(id, window.CFStreamSources[id]);
    }
  });
})();
The problem? This only ran once on page load. After a Barba.js transition, the video elements were fresh but uninitialized.
The video would just sit there. Black screen. No playback. No errors—just nothing.
Why Refactor to Classes?
Instead of just exposing the function globally (which would work), we decided to refactor into a class-based structure. Why?
Memory management – Classes let us properly clean up HLS instances before page transitions
State tracking – Each player instance maintains its own state (watchdog timer, stall counter, HLS instance)
Scalability – Easy to manage multiple video players on a page
Reusability – Clean API for reinitializing after transitions
The goal was to create a system that could:
Initialize players when the page loads
Clean up completely before page transitions
Reinitialize cleanly after new content loads
Handle multiple players on a single page
Prevent memory leaks
The Build Process
Step 1: Create the Player Class
First, we extracted the player logic into a CFStreamPlayer class:
The key addition here is the destroy() method—critical for cleaning up before Barba transitions.
This method:
Destroys the HLS.js instance
Clears the watchdog interval
Stops and clears the video element
Without proper cleanup, you get memory leaks. With every page transition, a new HLS instance would be created while the old one lingered in memory, eventually degrading performance.
Step 2: Create the Manager Class
Then we built a manager to handle multiple players:
class CFStreamManager {
  constructor() {
    this.players = new Map();
  }

  initAll() {
    if (!window.CFStreamSources) {
      console.warn('window.CFStreamSources not found');
      return;
    }

    // Clean up existing players first
    this.destroyAll();

    // Initialize new players
    for (const id in window.CFStreamSources) {
      const player = new CFStreamPlayer(id, window.CFStreamSources[id]);
      this.players.set(id, player);
    }
  }

  destroyAll() {
    this.players.forEach(player => player.destroy());
    this.players.clear();
  }
}
Simple and clean—track all players in a Map, destroy them all, reinitialize them all.
The Map data structure is perfect here because:
We can look up players by video ID
We can iterate over all players easily
We can clear everything in one call
Step 3: The Debugging Phase (This Is Where It Got Fun)
After writing the classes, we ran into a classic JavaScript gotcha:
window.cfStreamManager.initAll();
// TypeError: Cannot read properties of undefined (reading 'initAll')
Wait, what?
Lesson #1: Define the class, but don’t forget to instantiate it!
// This defines the class:
class CFStreamManager { }

// This creates an instance:
window.cfStreamManager = new CFStreamManager();
I had written the class definition but never actually created an instance. The class exists, but there’s no object to call methods on.
Fixed that, then hit another error:
window.cfStreamManager.initAll();
// ReferenceError: CFStreamPlayer is not defined
Lesson #2: Both classes need to be in scope!
The manager calls new CFStreamPlayer(), so both classes must be defined before creating the manager instance.
The correct order:
// 1. Define CFStreamPlayer class
class CFStreamPlayer { /* ... */ }

// 2. Define CFStreamManager class (which references CFStreamPlayer)
class CFStreamManager { /* ... */ }

// 3. Create the manager instance
window.cfStreamManager = new CFStreamManager();
This is a scope issue that’s easy to miss. If you define CFStreamManager before CFStreamPlayer, or if you instantiate the manager before defining the classes, you’ll get reference errors.
Step 4: Wire It Up with Barba.js
The final piece—make sure players reinitialize after every page transition:
barba.init({
  transitions: [{
    leave() {
      // Clean up before transition
      if (window.cfStreamManager) {
        window.cfStreamManager.destroyAll();
      }
    },
    afterEnter() {
      // Reinitialize after new content loads
      if (window.cfStreamManager) {
        window.cfStreamManager.initAll();
      }
    }
  }]
});
Why the if checks?
They prevent errors if:
The script hasn’t loaded yet
The page doesn’t have any video players
There’s a race condition during initialization
Defensive coding saves debugging time.
The lifecycle:
User clicks a link
Barba’s leave hook fires → destroy all players
Barba fetches new content
Barba swaps the DOM
Barba’s afterEnter hook fires → reinitialize all players
1. DOM Manipulation Libraries Need Special Handling with SPAs
Barba.js, Swup, or any page transition library will break your initialized components. Always plan for reinitialization.
2. Classes Provide Better Lifecycle Management
The destroy() method is crucial for preventing memory leaks and cleaning up resources. Without it, you’re creating orphaned objects with every page transition.
3. Defensive Coding Saves Headaches
Those if (window.cfStreamManager) checks prevent race conditions during page load and protect against missing dependencies.
4. Debug Systematically
When things don’t work, check in order:
Is the class defined?
Is the instance created?
Are dependencies loaded?
Are elements in the DOM?
Are methods being called?
5. Script Loading Order Matters
Make sure your player code loads before your Barba initialization. Use WordPress’s wp_enqueue_script dependencies array to enforce load order.
6. Watchdog Timers Are Your Friend
Live streams can stall for many reasons (network issues, server problems, codec errors). A simple watchdog timer that checks playback progress every few seconds can automatically recover from most issues.
Common Issues and Solutions
Video Doesn’t Initialize After Transition
Check: Is initAll() being called in the afterEnter hook?
Solution: Add a console.log to verify:
afterEnter() {
  console.log('Reinitializing players...');
  if (window.cfStreamManager) {
    window.cfStreamManager.initAll();
  }
}
Memory Usage Keeps Growing
Check: Are you calling destroyAll() before transitions?
Solution: Always clean up in the leave hook.
Multiple Players on Same Page Don’t Work
Check: Are all video IDs unique?
Solution: Ensure each video has a unique ID in both the HTML and the CFStreamSources object.
HLS.js Not Loading
Check: Is HLS.js enqueued before your player script?
Smooth page transitions with uninterrupted video streaming. Players cleanly destroy and reinitialize with each navigation, preventing memory leaks and ensuring videos always work, no matter how users navigate your site.
Performance impact: Negligible. The destroy/reinit cycle takes milliseconds, and Barba’s transitions mask any brief interruption.
Browser compatibility: Works everywhere HLS.js works (all modern browsers).
Maintainability: Clean class structure makes it easy to extend with new features.
What’s Next?
Potential enhancements:
Multi-quality streams with adaptive bitrate switching
Analytics tracking (play/pause/stall events)
Picture-in-picture support
Stream health monitoring dashboard
Automatic fallback to different CDNs
Happy streaming! 🎥
Got questions about implementing this in your own project? Drop a comment below or reach out.
Large images are killing your website’s performance. A 1.4MB JPEG might look great, but it’s costing you visitors. Slow websites lose traffic—in marketing terms, that’s bounce rate, and it directly impacts your bottom line.
The solution isn’t complicated: convert your images to next-generation formats. Here’s what that actually means and how to do it without wasting hours on clunky tools.
The Problem With Old Image Formats
Traditional image formats (JPEG and PNG) are inefficient by modern standards. Take a 1200×1500 pixel image:
JPEG: 1.4 MB
WebP: 250 KB
AVIF: 100 KB
That’s an 85-93% reduction in file size with virtually no quality loss at proper compression settings.
But here’s the thing most people miss: conversion alone isn’t enough. I see this constantly with client sites—someone uploads a 1500×1500 pixel headshot that displays in a 150×150 pixel box. The CSS scales it down visually, but the browser still downloads the full-size image. You’re forcing visitors to download 10x more data than necessary.
Best practice: match your image dimensions to their display context. If your blog never displays images wider than 1000 pixels, your images shouldn’t be wider than 1000 pixels.
Why This Matters for Architecture and Portfolio Sites
I work primarily with architects building portfolio sites. They spend years getting a project from drafting to completion, hire professional photographers, and those images need to look exceptional. But outside of niche architecture magazines, these photos live on their website—which means they need to look good AND load fast.
When a client sends me a 4000-pixel architectural photograph, I don’t want to shrink it to thumbnail size. I want to preserve the detail but cut the file size dramatically. That’s where format conversion becomes critical.
The Tier List: How Most People Convert Images (And Why It’s Painful)
I’ve ranked conversion methods by efficiency, because if you’re doing this regularly, time matters.
Bottom Tier: Online Converters
Sites like CloudConvert, FreeConvert, and dozens of others let you upload images for conversion. The experience is clunky:
Free tiers limit you to 5 images at a time
You constantly forget to set compression settings
Results are okay, not optimal
Premium plans cost up to $100/year
By the time you’ve converted 20 images, you’ve maxed out free credits
These work in a pinch, but they’re tedious for regular use.
Second Tier: Premium WordPress Plugins
Plugins like Smush offer free and paid tiers. The free version might convert to WebP but not AVIF. The paid version unlocks everything but often bundles features you don’t need—above-the-fold CSS loading, lazy load configurations, and other performance tweaks that can break your site if implemented poorly.
Here’s my issue: WordPress started as an open-source platform where people built useful tools. Now every plugin becomes a SaaS company. I find it obnoxious.
Third Tier: Desktop Applications
Apps like Permute (part of Setapp on Mac) let you drag and drop images for conversion. This is legitimately useful. I used Permute for years before writing my own script.
Now I just drag images onto an application icon, and it spits out WebP and AVIF versions at 85% compression—the magic number where quality stays high but file size drops significantly.
If you’re comfortable with desktop apps, this is solid.
Top Tier: Command Line with ImageMagick
If you can use terminal, this is the fastest method. Navigate to your folder, write a quick command to convert files at your preferred compression setting, and you’re done. No interface, no clicking through options, just direct control.
This requires comfort with command line, but the efficiency gain is worth learning.
The Solution I Built: A WordPress Plugin That Actually Makes Sense
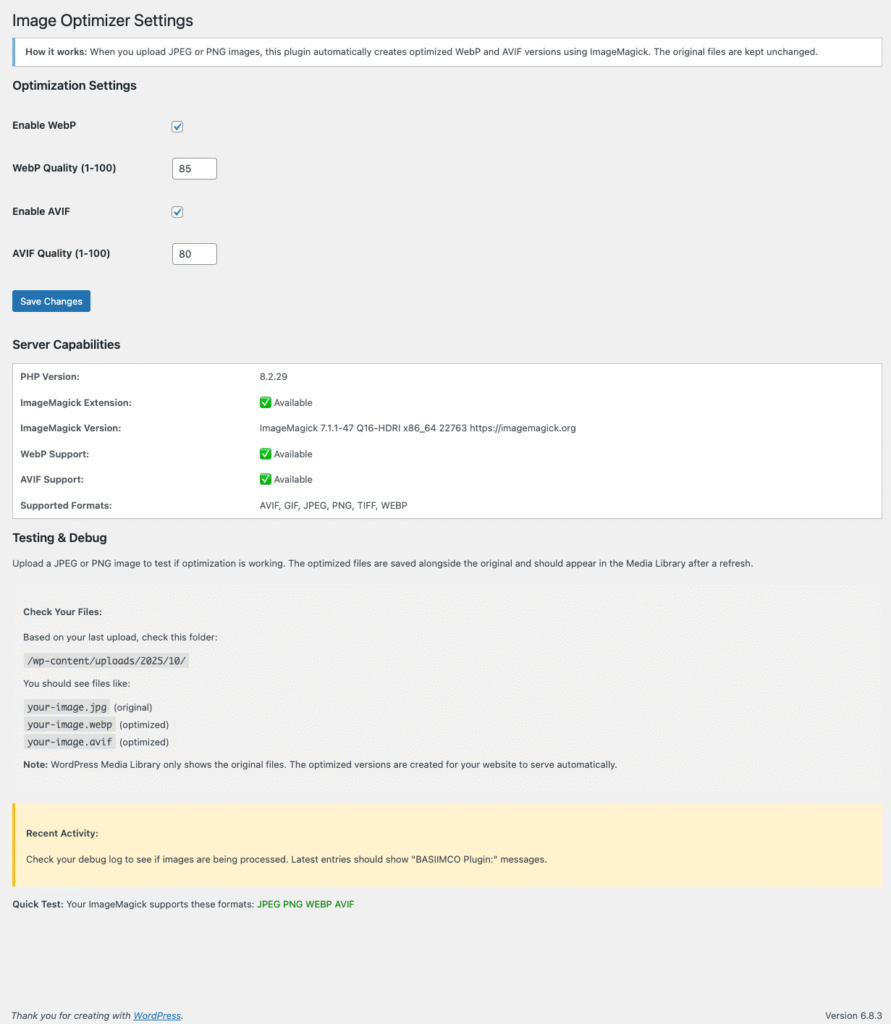
I wanted something simpler. So, i built a WordPress plugin that automatically converts uploaded JPEGs and PNGs to WebP and AVIF using ImageMagick in the backend.
Upload your original files, get optimized copies automatically. No extra steps, no manual conversion, no paying for features you don’t need.
The plugin creates all of WordPress’s default image sizes (thumbnail, medium, large, full) in next-gen formats. That means you’re not just getting lighter files—you’re getting contextually appropriate files that match how WordPress serves images. You can also set the compression for the webp and AVIF output here:
It’s free, and it’s called Basic Image Converter and Optimizer. I built it because clients kept sending me massive files and I needed an automated workflow.
Beyond Image Conversion: Other Quick Wins for Site Speed
Converting to next-gen formats is the obvious optimization, but don’t stop there. There are more ways to get your images working towards complete site optimization. Here are just a few:
Lazy Loading
Split your page into above-the-fold and below-the-fold sections. Load above-the-fold images immediately, defer everything else until the user scrolls. This drastically reduces initial download requirements.
Let the browser store files locally so repeat visitors don’t re-download everything. WordPress has plenty of caching plugins that handle this well.
.htaccess Conditional Serving (The Holy Grail I Haven’t Cracked)
Here’s one I’m still figuring out: using Apache’s .htaccess file to conditionally serve images. The idea is simple—if a JPEG exists on your site and an AVIF version exists in the same folder with the same name, automatically serve the AVIF.
This would be perfect for mass optimization without manually changing which files WordPress serves. If you’ve figured this out, let me know what I’m doing wrong.
The Bottom Line
Stop using old image formats. Convert to WebP and AVIF, match your dimensions to display context, and automate the process so you’re not wasting time on manual conversions.
Your site will load faster, your visitors will stay longer, and you won’t lose traffic to slow performance.
About the Author: Christian Sanchez runs Click Foundry, a WordPress development studio focused on custom themes, plugins, and optimization for architects and design professionals.
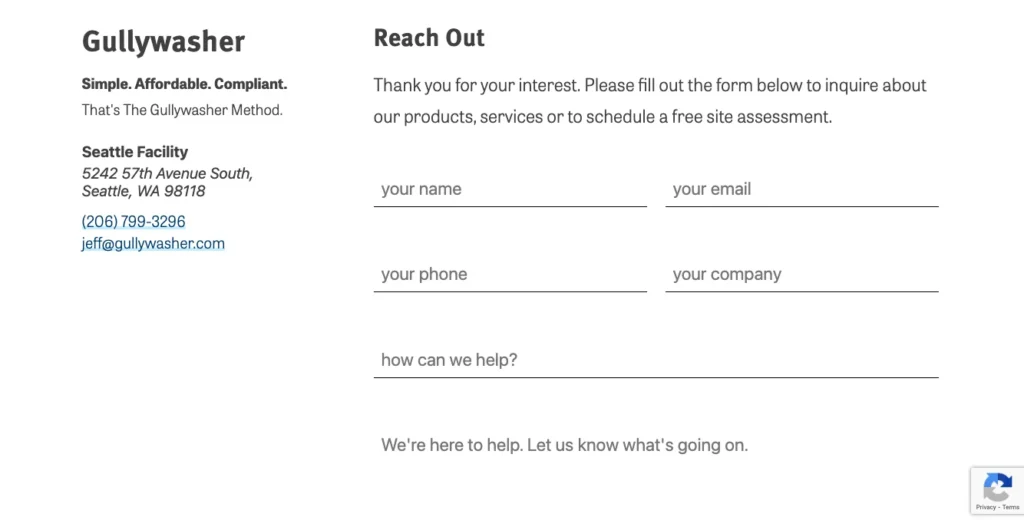
My new custom WordPress theme is finally up and running! You’re looking at it. I started building this website with the 2025 WordPress theme as a foundation on the 17th—it’s great as a starter, which is why I kept it while I was tooling around and adding features. Now, 13 days since uploading my first copy, we have something that feels like its own theme. It’s sparse, but it’s coming along.
this is what the site looked like when I was building placeholder pages for the site.
New Features
HLS Live Stream The HLS stream integration is there and working… sort of. I love the idea of the stream looking back at me—it makes me feel more efficient and on task. There’s something compelling about the possibility of someone watching and connecting in real-time.
The downside? I’m still new to Cloudflare, so I wasn’t aware that every new stream gets its own ID. That means I have to manually update the ID each time. I think I should add an admin page to the plugin that the stream function lives on. Then maybe i can just copy and paste the id in and it wouldn’t be such a hassle. I also can’t download the videos since they’re eight hours long, so I think I should split them in to shifts, separated by lunch probably. There has to be a way to automate that process.
Additionally, when I’m not live, it’s just replaying old live footage and for now that’s fine, but I think a placeholder video hosted on vimeo that just replays would be better. Not sure what that video would be, maybe just wood letter blocks being stacked to say that it’s no longer office hours and visions of cute forest animals coming out from behind the blocks.
Email Copy Button I added a simple email button that solves a problem I see everywhere. People still put mailto: links on websites, but those don’t work reliably anymore. The era of default mail clients opening automatically is gone.
My solution: a button that copies my email directly to your clipboard—whether you’re on your phone or desktop. It provides confirmation that it’s been copied, and then you can paste it wherever you need to. Simple, but effective.
Technical Stack
Barba.js Integration The site is running Barba.js. I’m trying to do more animation and transition work in my upcoming projects, so it’s important for me to use that system within this theme. Right now, there aren’t many animations—mostly just fade-in/fade-out transitions. But even that requires quite a bit of JavaScript on the backend to identify which page we’re on and apply the active stylings.
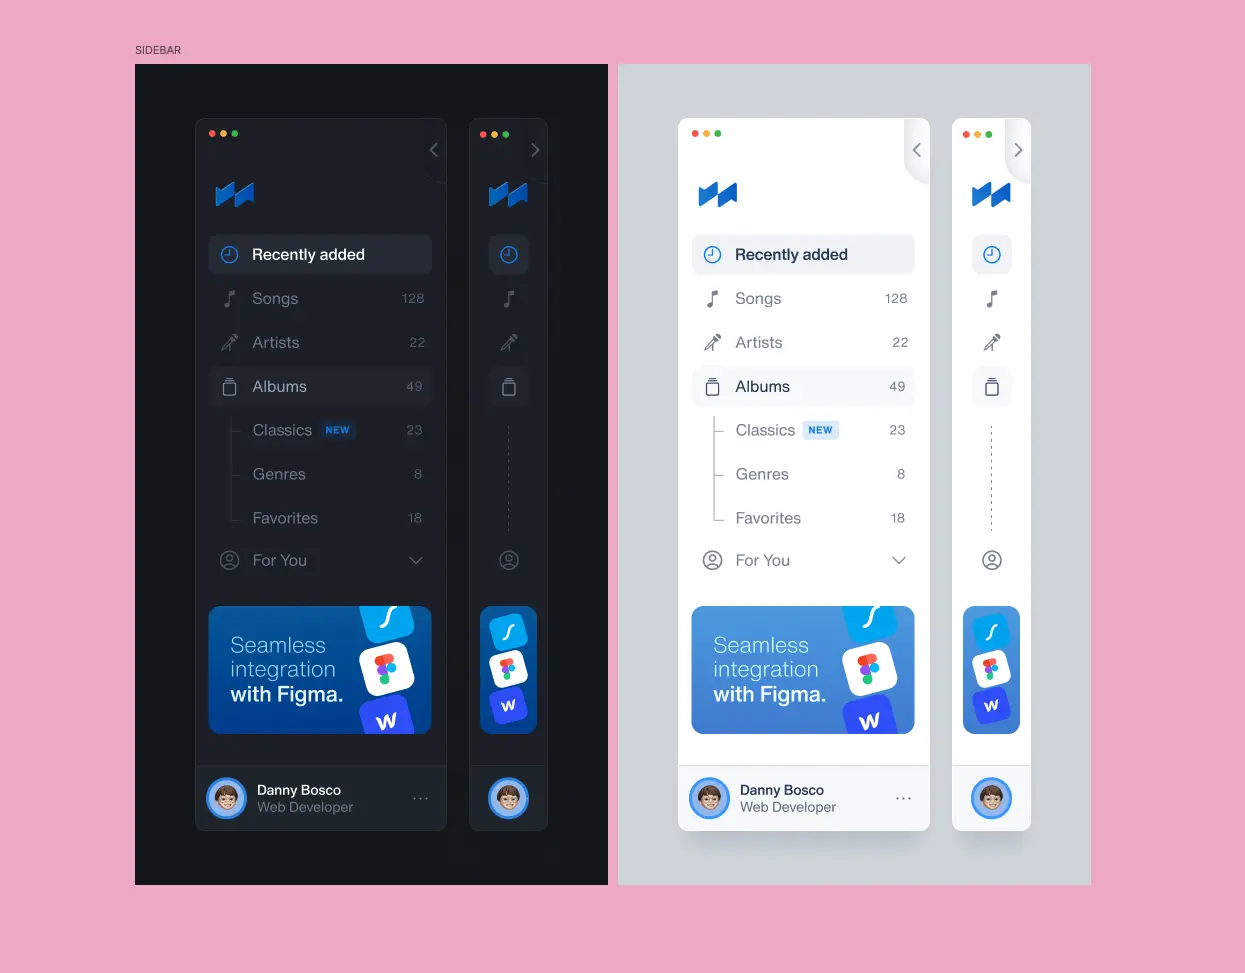
Design Philosophy I wanted the layout to feel like those side panel/main panel designs you see in generative chat applications. There’s an expandable sidebar that feels a bit like Claude’s interface. I’m planning more changes to that sidebar, but that’s the general direction.
I need to create a state manager for different viewport widths. For example, at 900px wide, maybe the bar should be open by default unless otherwise specified. I’m also planning to add icons for the homepage, about page, and notes section so that when the sidebar is collapsed, the icons remain visible.
I’m drawing inspiration from Gmail’s interface—Google has mastered the art of hideable UI. Everything is tucked inside a button. On desktop Gmail, you can close the sidebar, but if you hover over the remaining buttons, huge tooltips appear with all the functions you need. That’s the level of thoughtfulness I’m aiming for.
UI Elements
I built custom cards and buttons that follow my color scheme—that dark blue, light blue, Celtic blue palette I mentioned in a previous post.
The button design is particularly fun: it’s actually two SVGs stacked on top of each other, tilted at a 45-degree angle. When you click it, they move forward slightly, creating the illusion that the arrow is coming back in. I’m a fan.
What’s Working
The basics are sorted out. The notes page displays all my notes, and categories are handled. But there’s still work to do:
Add dates to notes
Decide on featured image thumbnails (maybe at certain widths, removed at others)
Add a title above the post section
A ton of styling refinements
Font work and overall style development
Future Plans
I didn’t copy the chat interface aesthetic for nothing. I want to add an actual chatbot feature, flagged somewhere above the services section on the homepage. The vision is a mix of a Slack channel and a chatbot—when I’m not available, the bot responds, but I’ll always see what it’s saying. Even when I am available, the bot can act as a helper.
There will be ongoing threads created each time someone engages with it. I’m a bit concerned about bots abusing the system, so I’ll need to develop some protection strategies. But that’s the goal: figuring out how to integrate an LLM.
Beyond that, I need to tackle the animation portion. Right now there are essentially no animations. I’m thinking:
Animation on scroll
Menu animations
A cooler swipe transition between pages
Moving Forward
It’s exciting to see this come together. From scratch to a functional theme in less than two weeks feels like real progress. There’s still plenty to build—the style needs development, animations need to be implemented, and the chatbot integration is a whole project on its own. But for now, I’m happy with where things are headed.
Last week, WordPress sent me their review feedback for the second iteration of my plugin. The good news? Most of the requested changes were straightforward technical adjustments focused on function naming consistency.
The main requirement was standardizing all function prefixes throughout the codebase. WordPress has strict guidelines about prefix formatting and length – and for good reason. With decades of plugin development and thousands of plugins in their repository, they need to prevent function name conflicts that could break sites.
Current Status
I completed all the requested changes and resubmitted the plugin last Friday. Based on their previous response time (they got back to me by Wednesday last week), I’m expecting to hear back by next Wednesday. Fingers crossed!
What the Plugin Does
While we wait for final approval, the plugin is fully functional and ready for testing. Here’s what it does:
Image Optimization Made Simple
Automatically converts JPEG images to modern WebP and AVIF formats
Delivers significant file size reduction – often 50% or more compared to traditional PNG/JPEG files
Faster loading times for your website visitors
Seamless integration with your WordPress media library
Want to Test It?
The plugin has passed all checks on my end and is working perfectly. If you’d like to try it out and provide feedback, you can access it via the link below. Your testing and input would be incredibly valuable as we approach the final release!
Yesterday my after-hours work started with fixing a video streaming feature I had been experimenting with. What began as a simple idea—showing a live feed of my office during work hours—turned into a multi-week journey through Raspberry Pi hardware, streaming protocols, WordPress plugin development, and some surprisingly tricky JavaScript debugging.
I’ve got a Raspberry Pi 5 in my office that I had bought for a dungeons and dragons coding project with my daughter. That project came and went, and now I needed to find a good use for it.
Since my site got hacked, I’ve been thinking about how I want to run Click Foundry moving forward. The biggest idea I wanted to communicate was “building in public.” I’m not a SAAS guy—I like making websites, plugins, and things that solve problems. As GPTs get better at coding, I’m able to turn small ideas into weekend projects.
And this project is exactly about that. It communicates that I’m out here working. Monday through Friday, I’m out here making stuff.
I remembered somewhere around 2014, there was a marketing agency I was too intimidated to apply for. Their home header was a video of their open office plan, with a bunch of people on laptops. And it affected me.
Looking back, I don’t think it was live, but I decided to do it live for a few reasons:
Building in Public—visually represented
Self-imposed digital panopticon—Maybe I behave better when I know someone is watching me, whether or not someone actually is
I have this Raspberry Pi collecting dust—Might as well use it
The Hardware Setup
The first part was the hardest: accepting that I would not be able to repurpose my baby webcam or any Arlo webcam quickly enough to get this project moving.
This drove me mad because at first I thought the Raspberry Pi should at least recognize the camera, and then we could go from there. But cameras made for certain purposes are locked from tampering—whether for security or to keep users within their ecosystem. I couldn’t get it to work.
So I bought a $30 Logitech webcam.
My Pi instantly recognized it. From there, it was a matter of figuring out how to turn that data into streaming data.
The GStreamer Pipeline
I ended up using FFmpeg and GStreamer, which are powerful tools for video processing. The challenge was:
Getting the Pi to recognize /dev/video0 (the webcam)
Finding the right resolution (1920×1080 didn’t work—camera maxed at 5fps)
Settling on 640×360 @ 30fps for reliability
Encoding to VP8 for web streaming
The test pattern stream helped me debug without the webcam:
The problem? The lag was several minutes, and sometimes it wouldn’t play at all. It wasn’t playing nicely with Barba.js, which handles page transitions on my site.
So I rebuilt it as a WordPress plugin with a shortcode that generates an HLS stream player using HLS.js.
The Plugin Architecture
The plugin had:
A shortcode: [cf_stream]
Settings for autoplay, mute, and control visibility
Cloudflare Stream integration
A custom video player wrapper
The shortcode would output a <video> element, and JavaScript would initialize an HLS player:
This worked great—until Barba.js page transitions broke everything.
Office Hours Automation
I didn’t want the stream running 24/7, so I built an office hours automation script (office_stream.sh) that:
Checks the current time every 5 minutes
Only streams Monday-Friday, 9am-5pm (with a lunch break)
Prevents duplicate stream processes
Logs all activity
The Script Logic
# Split schedule: 9am-1pm, break, 1:01pm-5pm weekdays
HOUR=$(date +%H)
DAY=$(date +%u)  # 1=Monday, 7=Sunday

if [ $DAY -ge 1 ] && [ $DAY -le 5 ]; then
    if [ $HOUR -ge 9 ] && [ $HOUR -lt 13 ]; then
        # Morning session
        start_stream
    elif [ $HOUR -ge 13 ] && [ $HOUR -lt 17 ]; then
        # Afternoon session
        start_stream
    else
        stop_stream
    fi
else
    stop_stream
fi
This script runs via cron every 5 minutes, ensuring the stream only runs during office hours.
Making It Work with Barba.js
The iframe approach didn’t work, and even the custom player broke after Barba.js page transitions. Why? Because Barba replaces the DOM, destroying initialized JavaScript instances.
The video element stayed in the HTML, but the HLS player instance? Gone.
The Problem in Detail
Barba.js creates smooth transitions by:
Fetching new page content
Replacing the DOM content inside a container
Triggering animations
But this means any JavaScript that initialized on page load—like our HLS video player—gets wiped out.
The Solution
I refactored the plugin into a class-based architecture with proper lifecycle management. This is covered in depth in a separate technical post:
Built time detection logic using PHP DateTime with LA timezone
Implemented priority-based video routing
Integrated Vimeo embeds for fallback videos with background mode
Added responsive CSS with 16:9 aspect ratio enforcement
What I Learned
1. Cameras Are Finicky
Vendor-locked devices (baby monitors, security cameras) are often impossible to repurpose. A cheap generic webcam solved everything instantly.
2. Test Patterns Are Your Friend
The GStreamer color bars test stream was invaluable for debugging. It separated hardware issues from software issues.
3. SPAs Break Everything
Page transition libraries like Barba.js require careful lifecycle management. Always plan for destroy/reinit patterns.
4. Latency Is a Tradeoff
I wanted ultra-low latency (WebRTC), but the complexity wasn’t worth it. 8-20 second latency via Cloudflare HLS was perfectly acceptable for this use case.
5. Progressive Enhancement Works
I kept the original functionality intact while adding new features. Existing shortcodes still work—nothing broke.
6. Admin UIs Matter
Non-technical users need simple controls. A few checkboxes and dropdowns made the difference between “unusable” and “useful.”
The Final Result
What visitors see:
Live office stream during work hours (9am-5pm, Monday-Friday)
“After Hours” video outside office hours
Fallback videos when I manually disable the stream
Seamless playback with no configuration needed
What I control:
Simple WordPress admin toggle to turn stream on/off
Office hours automation that I can enable/disable
Choice between lunch break or technical difficulty fallbacks
All video IDs configurable in one place
The tech stack:
Raspberry Pi 5 + Logitech webcam
GStreamer → RTMP → Cloudflare Stream
Bash script for office hours automation
WordPress plugin with shortcode
HLS.js for playback with stall recovery
Barba.js compatibility with lifecycle management
Vimeo for fallback videos
Try It Yourself
The plugin is designed to be reusable. If you want to embed Cloudflare Stream videos in WordPress with:
HLS.js playback
Automatic stall recovery
Barba.js compatibility
Time-based routing
Admin controls
…you can adapt this approach for your own projects.
Key components:
WordPress plugin with admin settings page
JavaScript classes for player management
Priority-based routing logic
Lifecycle hooks for SPA compatibility
Building in public means showing the messy parts. This project wasn’t clean or linear—it was a series of dead ends, pivots, and small wins. But that’s the point. You’re watching me figure it out in real time.